Table of Contents
- Spectu application settings
- Spectu administration in POSLavu
- Basics
- How to create a customized menu for Spectu
- Link examples
- How does Spectu treat the POSLavu settings and product/category options
- Sorting
- Images
- Modifiers
- Taxes
- The _Config category
- The _Printers category
- Basic printers setup guide (for Epson printers)
- Advanced printers setup guide (for non-Epson printers)
![[Important]](./images/admon/important.png) | Important |
|---|---|
Following text assumes knowledge of the POSLavu user's guide (http://support.lavu.com/hc/en-us/categories/200005283-POS-Lavu/) and Spectu user's guide. |
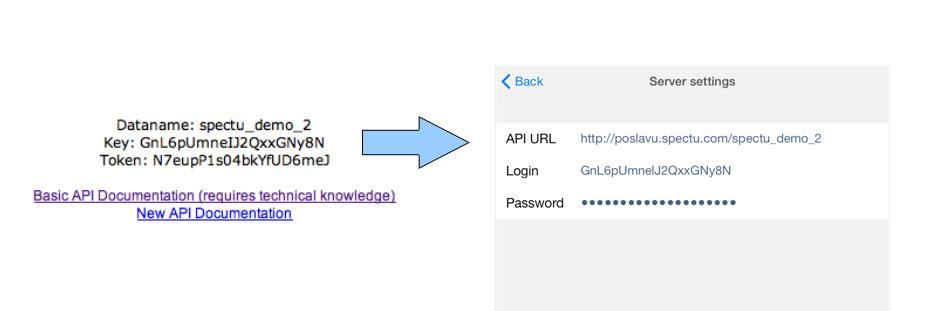
In the Spectu server settings you need to fill API URL, Login and Password fileds accordingly:
- API URL
https://poslavu.spectu.com/dataname
- Login
key
- Password
token
To get the dataname, key and token, please sign-in to the customer's POSLavu account at http://admin.POSLavu.com/cp/index.php?mode=api. The easiest way of how to get the data into the Spectu application is open the page on the device and copy&paste it right into Spectu settings.
Once confirmed, the application is automatically synchronized with the POSLavu server.
You need to synchronize the Spectu everytime you want to reflect changes made in POSLavu.
If you connect Spectu to any POSLavu database and skip the following additional Spectu configuration, the applicaton will display the menu in similar form as POSLavu does.
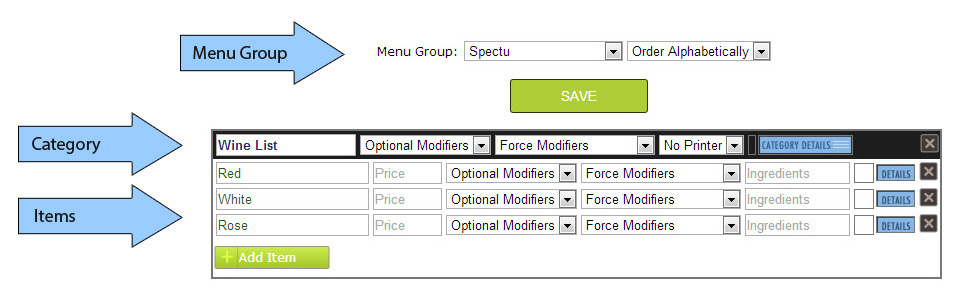
All Spectu configuration and settings is to be located in POSLavu menu group called Spectu.
_Config and _Printers categories in the Spectu menu group are used for setting up the Spectu ↔ POSLavu connection. All other categories of the Spectu menu group are used to setup the menu(s) displayed in Spectu application.
If you don't create the Spectu menu group in POSLavu, Spectu application automatically creates a menu called Spectu after synchronization and loads in all POSLavu menu groups.
If the automatically-made menu structure is not enough, you can use the Spectu-POSLavu link system which allows you customize the Spectu menu structure independently on POSLavu menu structure.
Categories of Spectu menu group (ex. _Config and _Printers category) are used for creating and editing menus for Spectu application.
Each item in these categories is linked to POSLavu menu group or POSLavu category. Thanks to this linking system you can create various kinds of menu structures without affecting the current structure of POSLavu menu groups and categories.
![[Note]](./images/admon/note.png) | Note |
|---|---|
If there is no such category in the Spectu menu group, Spectu application automatically creates a menu called Spectu after synchronization and loads in all POSLavu menu group. |
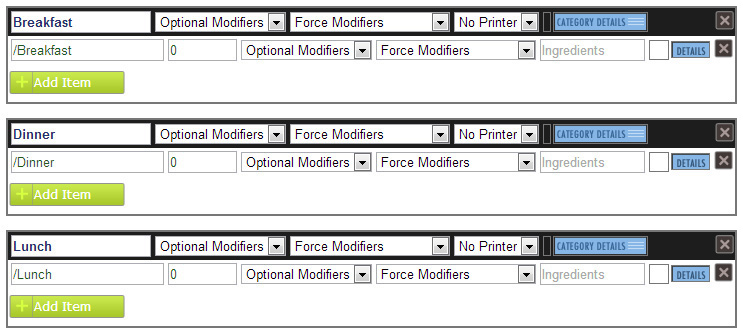
You can create a link to a menu group by creating the item with the same name as the POSLavu menu group you are linking to. For example as the figure below shows the Breakfast item is linked to POSLavu menu group called Breakfast. In the Spectu applicaton's menu called Spectu Menu 1 a category Breakfast will appear with the content of POSLavu menu group called Breakfast.

You can create a link directly to menu group content by creating the item with the name in format /menugroupname. For example as the figure below shows the /Breakfast item is linked to contents of POSLavu menu group called Breakfast. All categories located in POSLavu menu group called Breakfast will appear in the Spectu applicaton's menu called Spectu Menu 1.

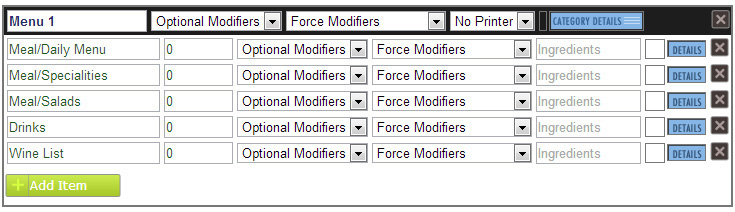
You can create a link to a category in a menu group by creating the item with the name in format menugroupname/categoryname. For example as the figure below shows the item Breakfast/Pancakes is linked to POSLavu category called Pancakes located in POSLavu menu group called Breakfast. In the Spectu applicaton's menu called Spectu Menu 1 the category Pancakes will appear with content of POSLavu category called Pancakes.

This option is suitable for restaurants using POSLavu menu groups to split the inventory by product kind (e.g. Drinks, Meals, Appetizers...).
Display in App option has the same meaning for Spectu as for POSLavu. Choose „No“ to hide the item or a category. In case you want to hide the menu in Spectu application only use the Display in app attribute of the category located in the Spectu menu group.
If you want to add a description of the product and display it in the Spectu application use the POSLavu Description option. At categories and items inside the Spectu menu group the Description option servers a different purpose. You can fill in the following values:
„list“, the content will be displayed as a list
„grid“, the content will be displayed as a grid (tiles)
„auto“, (default) - the application will choose the best viewing style automatically according to the content.
All content in Spectu application is sorted alphabetically. Manual ordering is not supported yet because the POSLavu API does not support this feature.
Spectu application is using the standard images uploaded into POSLavu. Images assigned to categories or items inside the Spectu menu group have priority before the images assigned elsewhere.
Spectu supports POSLavu Forced modifiers, Optional modifiers and Modifier groups. Application displays modifiers in product's detail view.
| Important |
|---|---|
Spectu does not support obsolete multi-level detour modifiers, in other words situation when one modifier has been assigned directly to another modifier. In case you need to make this kind of structure, please start using new possibilities of POSLavu modifier groups. |
- Forced modifier
If the item has force modifier, in application you have to choose at least one force modifier before ordering the item.
- Optional modifier
The modifier choice is optional.
- Modifier groups
Application will show modifier groups. Application ignores default POSLavu modifier groups (for example *Courses, *Gift Card, *Seats etc.)
- "Choice" modifier
You can choose only one modifier.
- "Checklist" modifier
You can choose one or more modifiers.
| Note |
|---|---|
Modifier sorting in Spectu will not match with the custom-made modifier sorting in POSLavu. Spectu is sorting modifiers by their IDs as POSLavu does in default. |
Spectu application displays the item's prices filled in POSLavu price field. POSLavu TAX settings does not have any effect on item's prices in Spectu.
| Important |
|---|---|
If you are using POSLavu Tax profiles and all POSLavu item's prices are ex. VAT, Spectu will display prices ex. VAT through all menus and bills. |
| Note |
|---|---|
There is no "Tax profile" attribute in POSLavu API. That is why Spectu cannot work with Tax profile settings. |
This category is used to hold Spectu ↔ POSLavu configuration data. Each item in this category represents one parameter. Parameter code is filled-in as the item's name, parameter value is entered in the item's Description field.
| Note |
|---|---|
If any parameter is not defined, the Spectu application behaves accordingly to the parameter's default value. |
There are two kinds of parameters:
SPECTU_ parameters – used to configure the Spectu application. You can find a detailed list of these parameters in the Spectu user's guide.
EXPORT_ prefixed parameters – used to configure the data export from POSLavu to Spectu.
Table 1. Export parameters
| Code | Name | Default value | Description |
|---|---|---|---|
EXPORT_USE_UNIVERSAL | Use the Universal menu group | YES | YES = menu group Universal works the same in Spectu as in POSLavu. NO = menu group Universal is omitted in Spectu application. |
| Note |
|---|---|
For positive boolean value type-in "1", "true", "on" or "yes" (case insensitive). Everything else is considered as negative. |
This category is used for configuration of printers. Each item in this category represents one printer. Printer's name is to be filled-in as the item name and the printer's configuration is entered in the Description field of the item. The printers need to have the same configuration as have the printers defined directly in POSLavu printer settings.
Table 2. Printers' parameters
| Code | Description |
|---|---|
|
ID |
There are kitchen and receipt printers in POSLavu. Spectu can by connected only with kitchen printers. POSLavu printer with setting name “kitchen” has ID = 1, POSLavu printer with setting name “kitchen2” has ID = 2 etc. |
|
ip address |
IP address of the printer. The IP address has to be accessible locally from every Spectu device in the restaurant. |
|
port |
IP port of the printer |
| printer's model (optional) | Printer's model |
| printer's parameters (optional for Epson-like printers. For others please see Advanced printers setup guide below) |
|
Printer parameters are entered in the Description field as shown in the table below. Values are separated by a semicolon:
ID; IP address:port; printer's model; {"key1"="value1", "key2"="value2"}
Create a standard kitchen printer in POSLavu and assign it to a category and products that will be printed on the printer.
In the category _Printers create an entry with a description of the form "ID; IP address:port". IP address and port is the same as setting of functional kitchen POSLavu printer. The ID corresponds to number XX in the name "kitchenXX" of POSLavu printer. For example "kitchen" has ID = 1, "kitchen2" has ID = 2, etc.
In the category _Config create a parameter SPECTU_PRINT_MESSAGE_PRINTER_ID with a value of ID printer you want to print the messages. ID of the printer you can find similarly as in the previous point.
Each printer manufacturer uses a different control codes for basic operation of the printer (for example signal for auto-cut sequence). If your printer does not work properly, in step two from Basic printers setup guide configure the printer according to the table below. If the values in the table does not work with your printer or there is not your printer model, please contact us at support@spectu.com.
Table 3. Printers parameters for specific models
| Printer model | Printer's parameters |
|---|---|
| Epson (default) | ID; IP address:port; Epson;{"line_width":42, "esc_cut":"#27#105", "ending_line_feeds":5} |
| Star - Line mode (TSP650, TSP700, TSP800, SP700) | ID; IP address:port; Star;{"line_width":42, "esc_cut":"#27#100", "ending_line_feeds":5} or for specific models ID; IP address:port; Star;{"line_width":42, "esc_cut":"#27d1", "ending_line_feeds":5} |
| Star - Page mode (TSP800II, TSP1000) | ID; IP address:port; Star;{"line_width":42, "esc_cut":"#27#66", "ending_line_feeds":5} |